
Observed Symptoms:
Excessive steering vibrations when braking at high speeds (upwards of 50 mph). This was getting progressively worse.
Diagnosis:
Symptoms point towards warped Front Brake rotors. Also visual inspection showed Rear rotors were rusted. Rear pads were close to end of their life. Front pads had almost half life remaining
Plan of Action:
Replace Front and Rear Rotors and Pads.
Replacement Parts:
NAPA Ultra Premium Front and Rear Rotors
NAPA Ultra Premium Front and Rear Brake Pads
Tools and accessories:
3 ton Hydraulic Floor Jack
3 ton Jack Stands (2)
Wheel Chocks (2)
Caliper Lube
High temp lube
Anti-seize lube
6" C-Clamp
Torque Wrench
Wire Brush
Bungee Cord
Brake Parts Cleaner spray (2)
impact driver
rubber mallet
Mechanics gloves
Dot3 Brake Fluid
Plastic Syringe
Front Brakes Procedure:
STEP 1: Loosen lug nuts on both front wheels.
Do not remove lug nuts all the way. Just loosen them enough to be removed by hand. Use the lug wrench provided with the car. A good idea is to stand on the wrench end to exert adequate torque without too much effort

STEP 2: Lift and support
Lift the car using a hydraulic floor jack at the front lift point. Place 2 jack stands at the jack pads on the rocker panel behind the front 2 wheels. Supporting the car at any other location would cause damage to the vehicle frame. Lower the vehicle slowly onto the jack stands.
If you are working outside on a tarmac surface then you will need to place some pine boards under the jack and the jack stands to evenly distribute the weight and prevent sinking of the jack/jack stands in the tarmac. This is important. If the jack or stands sink into the hot tarmac then the vehicle will become unstable and it may slip


STEP 3: Remove wheels
loosen the lug nuts and remove both the front wheels. This will expose the front disk brake assembly.

STEP 4: Spray Brake cleaner and clean
Before you start disassembly, spray the whole assembly generously with the brake parts cleaner. This is to safely remove any brake dust. Remember dust brake inhalation is not too good for your lungs and health

Then using a wire brush scrub off excessive rust from the exposed surfaces

STEP 5: Remove Brake Caliper
To remove the brake caliper you will first need to compress the pistons. The caliper piston will be in extended position. To do this first open the car hood and take the cap off the brake reservoir.
Then take a 6" C-Clamp and compress the caliper. Rest the clamp fixed end behind the caliper making sure you are not applpying load on any part of the brake hose. Rest the adjustable end of the clamp on the brake pad back face exposed through the caliper arms. Tighten the clamp til the point it stops moving any further

Then use a flex head ratchet/breaker bar to remove the 2 caliper bolts at the back of the caliper. These are M17 bolts.


Clean these caliper bolts and keep aside. Note that one of these bolts has a rubber bushing at the end. This bolt goes into the upper bolt hole of the caliper flange

The brake hose attached to the caliper is bolted to the frame using a 2 bolt bracket. Remove these bolts to detach the bracket/hose from the frame

Then pull off the caliper from the disc. Since we compressed the pistons the caliper should come off easily. Use a bungee cord to hang the caliper making sure the brake hose is not twisted or stressed. I used the suspension spring to hang the bungee cord. Also make sure the caliper is out of your way to remove the other components

Spray brake cleaner on the inside of the caliper and use a small wire brush to clean the inside. Do not srub against the piston boot. The wire brush will damage the boot.
STEP 6: Remove brake pads
Loosen the brake pads by hand and take them off.

Remove the pad aretainer clips at the top and bottom of the caliper bracket. You might need to pry these using a screwdriver. Clean these using brake cleaner spray and a small wire brush

STEP 7: Remove Caliper Bracket
Spray Brake parts cleaner on the caliper bracket to remove any brake dust
Use a Wire brush to scrape off excessive rust from the caliper bracket

Cleaned brake caliper bracket looks like this

Use a breaker bar or a long ratchet to remove the 2 caliper bracket bolts. These have a lot of torque on them so you will need a good breaker bar or a lot of effort or both.

After you remove the 2 bolts the caliper bracket comes off. Clean it with a wire brush and brake cleaner spray

This is how the assembly looks with the caliper, pads and caliper bracket removed

STEP 8: Remove rotor disc
To remove the rotor disc you will first need to unscrew 2 retaining screws. These are a PITA to remove. I had to use a impact driver to remove these. The impact driver is a small stubby device to which you can attach a philips screw head. You strike the back of the driver using a ruber mallet to apply a large torque (~ 300 lb-ft). Make sure the impact driver is set to unsrew rather than tighten it (similar to ratchet)

both the screws came off after 4-5 strikes
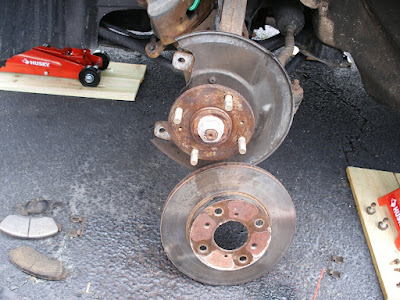
The next PITA is getting the rotor off the wheel hub. THe rust and brake dust causes the rotor to stick to the hub. First of all clean the edge of the edge of the rotor near the hub center to remove any grime. Then take a hammer and strike with medium intensity on the protruded part of the rotor (cylindrical surface). Keep pushing on the rotor with both hands. repeat as needed till you can shake the rotor off the hub
This is how it looks with the rotor removed
Clean the wheel hub with a wire brush and brake cleaner spray.

Apply a high temp lube on the hub face and on the lug bolts
STEP 9: Install new rotor
Take the new rotor out of its packaging. Manufacturers apply a coat of oil on the rotor to prevent rust. You need to take this oil coating off to prevent brake pad contamination. Sparay the new rotor with the brake cleaner and wipe off the oil coating with a shop towel
Install the new rotor on the hub making sure the retaining screw holes match up

Apply some anti-sieze lube to the retaining screws and insert in the screw holes. Tighten by hand screw driver as tight as you can get it with your hands alone. These screws are just to hold the rotor during installation. So there is not torque spec on these

STEP 10: Install caliper bracket
Apply high temp lube on the caliper bracket bolts
Install the cleaned caliper bracket using the 2 bolts. The torque spec on each of these bolts is 80 lb-ft
. Use a torque wrench to torque to correct spec

STEP 11: Install pad retainers
Apply Caliper lube to the grooves on the caliper bracket where the pad reatainers are seated.

Place the pad retainers in place. Apply caliper lube on top of the pad retainers where the brake pads would rub against the retainers
STEP 12: Install brake pads
Take your new brake pads out of their packaging. NAPA includes a anti-squeal pouch along with the brake pads.
Remove the brake pad backing plates. Apply the anti-squeal on the back of the pads.
Reinstall the backing plate and appply some more anti-squeal on the back of the backing plate

Slide the brake pads on the caliper bracket on top of the pad retainers
Note that the pad with the wear indicator strip goes on the inner side of the caliper. Also the wear strip should be at the top. Make sure the pads are well seated and are flush with the rotor surface


STEP 13: Install Brake Caliper
Apply caliper lube on the inside of the pin boots on the caliper and on the caliper bolts

Before you can install the caliper you will need to push the piston further inside. Take the old pad, place it against the piston. Then take the C-clamp and rest the adjustable end on the pad and compress the piston till it stops moving any further
Then take the caliper out of the bungee cord and slide it over the pads and caliper bracket. Make sure the pin boot is not twisted or pinched.
Slide on the lubed caliper bolts and torque them to 54 lb-ft each. Make sure you place the bolt with the rubber bushing tip on the upper end.
This is how it looks with the brake system re-assembled. Do not forget to take the bungee cord out of the suspension coil

STEP 14: Install wheel
Put the wheel on. This is a good opportunity to swap the front wheels for a wheel rotation. Tighten the lug nuts by a ratchet as much as you can before the wheel starts spinning.
STEP 15: Repeat process on the other side front wheel
STEP 16: Torque lug nuts and Lower vehicle
Raise the jack enough to take off the jack stands. Lower the jack till the wheel contact with the road/surface but not fully load the wheels. Torque the lug nuts to 90 lb-ft with a torqu wrench in a star sequence. This is important to make sure the rotor is evenly loaded. TOrque the lug nuts in steps
Finally lower the jack completely and re-check torque on lug nuts
STEP 17: Check brake fluid reservoir
Take a plastic syringe and remove old brake fluid from the reservoir. DO not remove fluid to the extent that it exposes the fluid hose opening at the bottom. THis will introduce air in the system.
Add fresh new DOT3 brake fluid to the reservoir to the max level. Put the reservoir cover on.
Sit in the drivers seat and pump the brake pedal till it becomes still. Recheck brake fluid level in reservoir and add fluid if needed.
STEP 18: Brake pad break in
It is important to break in the new brake pads. The break in process is to remove the protective coating off the brake pad friction surface and to transfer a layer of brake pad material onto the new rotor.
To break in the pads:
- Take a car out on an empty road
- speed up to 30-40 mph and brake lightly to a stop. Repeat this 3-4 times
- speed up to 50-60 mph and brake with medium effort to bting it down to 20-30 mph. Repeat 3-4 times
This process gets the brake pads heated up and transfers a this layer of pad material onto the new rotors
Thats it!! You have front brakes as smooth as cutting through butter
STEP 19: The Finale
Very important. Go home, clean up and open up a bottle of cool refreshing beer.

Don't knwo why, I like the last step in all your procedures. Count me in just for that...
ReplyDeletevery interesting post.this is my first time visit here.i found so mmany interesting stuff in your blog especially its discussion..thanks for the post!
ReplyDeleteBest Brake Rotors for Trucks
I think this is an informative post and it is very useful and knowledgeable. therefore, I would like to thank you for the efforts you have made in writing this article. brakepadblog.com
ReplyDelete